Photo Credit
Avalanche beacons are one of the most vital pieces of equipment for backcountry travelers. They're relatively new pieces of technology, especially when compared to the advent of skis–the first beacon was made in 1968. But in that short amount of time, the tech has progressed exponentially, and is now considered a crucial piece of gear for both you and your partner's safety. This year, our experts recommend the Mammut Barryvox 2 as the best beacon for an active backcountry user. Time-tested and easy-to-use, it has all the features an amateur snowhound needs at a better price than most. We have other picks too, including simple entry-level transceivers and feature-rich options for guides and patrollers. For additional information, see our comparison table and buying advice below, as well as additional information about our testing process.
Editor’s note: This article was updated on September 23, 2025, to update information to current industry-accepted best practices and update our recommendations according to feedback from long-term testing and model upgrades.
DISCLAIMER: There are inherent risks to traveling in avalanche terrain, and we don't condone the use of a beacon––or any avalanche safety tools––without proper education. Visit avalanche.org's course page to learn about backcountry education training in your area.
Our Avalanche Beacon Picks
- Best Overall Avalanche Beacon: Mammut Barryvox 2
- Best Beacon for Professionals and Advanced Users: Mammut Barryvox S2
- Best Avalanche Beacon For Beginners: Backcountry Access Tracker 3+
- Best Budget Beacon: Backcountry Access Tracker S
- Tested & Dismissed Beacons
Best Overall Avalanche Beacon
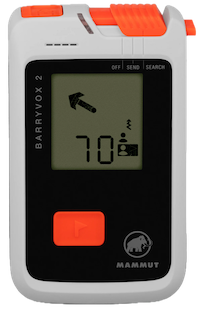 1. Mammut Barryvox 2 ($399)
Weight: 6.3 oz. (including batteries)
Maximum range: 70m
Battery: AAA (2)
What we like: User-friendly backlit display and impressive range.
What we don’t: Some users report issues during fine search.
Mammut avalanche beacons have a solid reputation among snow sports enthusiasts and professionals, and the Barryvox 2 is the flagship example of a well-made and reliable transceiver. Reaching up to 70 meters, it offers one of the largest receiving ranges on the market, and the backlit screen is easy to read and interpret with a variety of helpful images, and many will find this superior to the LED display of other models like the BCA Tracker. New for the 2, the Guided Fine Search feature will help newer users avoid some of the common mistakes while executing a fine search, saving valuable minutes when it counts. The switches are large enough to operate while wearing bulky gloves or mittens, and it also has one of the best marking functions among mid-range beacons—it’s particularly better than the Tracker3. Taken together, the Barryvox 2 offers most of the quality and usability of the high-end Barryvox S2, but in a simpler package that’s competitively priced.
Something to note with the Mammut beacons is their processing speed when compared to other brands like BCA or Pieps. Mammut processors are more exact, but slightly slower than competitors. Because of this, some users report that the beacon signal can get jumbled during multiple-burial scenarios. But this isn't a flaw; it's reflective of the fact that users need to watch their speed during the fine search part of a rescue in order to allow the beacon time to interpret signals. It's a few seconds more for an arguably more accurate result, which in the end could get you those seconds back. In addition, Mammut has yet to integrate Bluetooth connectivity. That said, Barryvox users are a devoted bunch, and it’s a great value for recreational backcountry days.
See the Mammut Barryvox 2
Best Beacon for Avy Professionals and Advanced Users
 2. Mammut Barryvox S2 ($599)
Weight: 6.5 oz. (including batteries)
Maximum range: 70m/95m (digital/analog)
Battery: AAA (3)
What we like: Top-of-the-line search range and feature set, updates via Bluetooth.
What we don’t: Overkill for most recreational users.
Most of the beacons here appeal to recreational users, but ski guides, patrollers, and other avalanche professionals need additional functionality. Specifically, this includes better search range, increased battery life and processing speed, detailed display graphics, and state-of-the-art features like a U-turn indicator to keep them searching in the right direction. Within this category, the Mammut Barryvox S2 is far and beyond the best option, with a 70-meter range (95m in analog mode), up to 400 hours of battery life, and a clear visual interface with intuitive, animated instructions. Despite all of these add-ons, it’s still competitive with less featured beacons in both weight and size.
The Barryvox S2 took our space for the best professional beacon this year due to its newest features. New in the S2, there is a Guided Fine Search feature that keeps users on track during a fine search and helps with bracketing properly (any avalanche educator will tell you this is one of the biggest struggles). The processing speed for multiple and single burials is even faster than the previous model, and Mammut even added a Bluetooth feature that makes updating your device easier than before. While we can’t say that the price is worth it for everyone, the updated features give this beacon huge appeal for both the pros and the amateurs serious about their tech. If you want most of these features at a slightly cheaper price, check out our top choice, the Barryvox 2.
See the Mammut Barryvox S2
Best Avalanche Beacon for Beginners
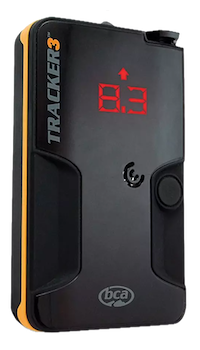 3. Backcountry Access Tracker 3+ ($350)
Weight: 5.8 oz.
Maximum range: 50m
Battery: AAA (3)
What we like: A proven and reliable model, now with new software.
What we don’t: No Bluetooth connectivity and a shorter search range than our top pick.
Backcountry Access's (BCA) Tracker 3 has been one of the most popular and well-regarded beacons for years running because of its sleek and intuitive design, digital display, functional and accurate send and receive, long search range, not to mention buttons that are easy to use with gloves on. The light and sleek design still comes highly recommended by pros, and we haven’t personally experienced or heard of any issues with the durability or handling of the Tracker 3. The only difference between his year's model, the Tracker 3+, and the original is that it has a new software version. That' because, according to the BCA website, "there’s some new hardware on the circuit board from new suppliers. These chips need slightly different code than their predecessors."
We have noted that the flagging function shuts off after a minute (which might be inconvenient), and it doesn't have Bluetooth connectivity (though neither does our top pick. And importantly, the Tracker 3 is not the most recent model in the series. BCA has since come out with a Tracker 4, which gives you all of the innards of the Tracker 3, but with a rubberized, over-molded case and a larger and brighter LED display. The Tracker4’s cosmetic improvements are nice, but we didn't think it was enough to justify the extra $50 jump in price.
See the Backcountry Access Tracker 3+
Best Budget Beacon
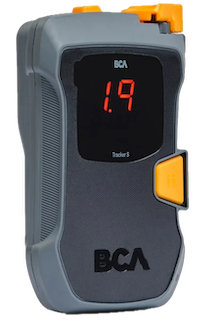 4. Backcountry Access Tracker S ($300)
Weight: 7.6 oz.
Maximum range: 55m
Battery: AAA (3)
What we like: Everything you need for basic burial scenarios.
What we don’t: Multiple burial scenarios aren't top-tier. Regular backcountry travelers will likely want more features.
The S in Tracker S stands for simple, and that says it all. It's a no-frills, yet still highly functional beacon. It still has the quick processor that BCA is known for, and is solid for single burial scenarios. The battery life is above average when compared to other beacons we've tested, and the ease of use cannot be understated. For a weekend warrior on a budget, or a sometimes-backcountry beginner, this beacon is an incredible value.
There are downsides to the TrackerS, however. Most notably, once you have more than 1, and notably more than 2 victims buried in a search, this beacon struggles. The TrackerS will unsuppress a signal after 60 seconds, meaning that if you're in a multiple-burial scenario or a close-proximity scenario, the signal may inadvertently jump to another beacon. The range is only 55 meters, which isn't small, but when compared to the Barryvox 2 (at 70m), it's hard to compare. We also don't love that the screen uses "tr" for transmit on its display and "se" for search, which can be confusing since send also starts with "se". That being said, if you're on a budget, the TrackerS is simple and affordable.
See the Backcountry Access Tracker S
Tested & Dismissed Beacons
The Black Diamond Guide BT is one of the many beacons that was affected by Black Diamond's (BD) voluntary recall in 2022. Overall, it has high-level functionality and many of the devices are in perfect working order, but we're giving the edge to the Barryvox S for its greater range, analog mode, innovative feature set (including U-turn indicator), and svelter dimensions.
The recreationally-focused BD Recon X was also one of our recommendations once upon a time, and it has a slight edge over the Tracker 3+: slightly more range, battery life, plus Bluetooth functionality. But considering the long history of recalls at Black Diamond, we think you'll have more peace of mind purchasing a Tracker 3+.
The Arva Neo BT Pro is a premium beacon for pros that's jam-packed with functionality similar to the Barryvox S, and it costs less––but therein lies the problem. It occupies a middle ground. As such, most pros may want to stick to more familiar and featured models like the Mammut or BCA, and recreational users who are looking to save money will benefit from the BCA Tracker 3+.
The Ortovox Diract Voice and Ortovox Diract were former picks, but we have since removed them from our recommendations. Over time, they have proven not to perform well in the critical fine search. Even with the innovative voice guidance of the Diract Voice, without the complete performance throughout the search process, many guide services are moving away from these. As such, we feel more confident recommending the Barryvox 2 and Barryvox 2S.
The BCA Tracker 3 was our top pick in 2024, and it has been updated to the Tracker 3+, our current beginner pick. The Tracker 4 is an excellent beacon as well, but it costs $50 more for a burlier case and LCD display. We think the 3+ still provides the best value for the money.
The Mammut Barryvox S is the original model of the Mammut Barryvox S2, which is now our top choice for professionals.
Avalanche Beacon Comparison Table
| Beacon | Price | Weight | Range | Battery | Battery Life | Bluetooth |
|---|---|---|---|---|---|---|
| Mammut Barryvox 2 | $425 | 6.3 oz. | 70m | AAA x 2 | 450 hours | No |
| Mammut Barryvox S2 | $599 | 6.5 oz. | 70m | AAA x 2 | 450 hours | Yes |
| Backcountry Access Tracker 3+ | $350 | 4.2 oz. | 50m | AAA x 3 | 200 hours | No |
| Backcountry Access Tracker S | $300 | 5.5 oz. | 50m | AAA x 3 | 200 hours | No |
About Our Testing Process
We always consult and rely on professionals to help with the details of researching and reporting on our guides. Our current expert, Brooke Maushund, is a year-round avalanche forecaster and educator for the Eastern Sierra Avalanche Center, and was instrumental in providing the latest thinking and highest level of expertise for this update.
Avalanche Beacon Buying Advice
- What Is an Avalanche Beacon?
- Beacon Antennas
- Send and Search Modes
- Search Range and Width
- Digital vs. Analog Beacons
- Avalanche Beacon Functions
- Weight and Dimensions
- Durability and Waterproofing
- Recalls
- Batteries and Battery Life
- Bluetooth Connectivity
- Beacon Harness And Tether
- Software Updates
- Avalanche Education
- Completing Your Backcountry Kit
What is an Avalanche Beacon?
An avalanche beacon, also called a transceiver, is an essential piece of gear for backcountry travel in snow-covered terrain. This battery-powered device allows you to both find and be found in the event of an avalanche by sending or receiving signals over an electromagnetic frequency (the international standard frequency is 457 kHz). Modern beacons operate digitally using three antennas (some have analog modes as well) and are powered by either AA or AAA alkaline batteries. Every member of a party must have their own beacon—stored in an easy-to-access location on their body like a chest harness or dedicated zippered pant pocket—and proper training on how to use it.
In general, beacons can be broken down into two categories: those ideal for recreational use and those geared towards professionals such as ski guides, avalanche course instructors, and patrollers. If you’re new to backcountry travel, simpler is almost always better when it comes to your beacon. In the event of a slide, the last thing you want is to be swapping through settings and wasting time trying to find search mode. And cost almost always correlates with complexity, so those just getting into backcountry adventuring definitely don’t need to spend up for the most premium model. Avalanche professionals, on the other hand, often benefit from the advanced features and functionality that come with more expensive models. In either case, however, the best beacon is the one that you know how to use.
Beacon Antennas
Dr. John Lawton invented the first avalanche transceiver at Cornell Aeronautical Laboratory in Buffalo, New York, in 1968. Hitting markets in 1971 for the first time, branded as the Skadi, Lawton’s invention used a single antenna for direction, and the volume of the beep increased as you got closer to the victim. Ed LaChapelle—a pioneer in the avalanche industry—helped Lawton develop his ideas and bring the breakthrough safety device to market. These analog, single antenna beacons were the norm, with some frequency adjustments to improve range.
A then-little company from Colorado called Backcountry Access released the first 2-antenna, digital transceiver in 1997. The BCA Tracker DTS and subsequent 2-antenna digital models from other brands quickly became the new standard. These beacons used two perpendicular antennae to calculate distance to the other beacon, and through the difference between these two readings, put an arrow on the screen to indicate the direction to search. The digital capabilities meant that microprocessors mitigated some human error in searching, were easier to use, and processed signals faster. This led to a higher recovery rate of avalanche victims.
In 2003, the Pieps DSP was released, the first three-antenna beacon. While keeping all the same benefits of the two antennas from the early 90s, Pipes added a smaller, vertical third antenna that only turns on when the user is close to the avalanche victim. This is largely to improve the beacon’s accuracy when there are “spikes”, or in other words, when the strongest signal isn’t directly above the beacon you’re searching for but off to the side. Flux lines—the rounded planes that beacon signals transmit on—are responsible for this. Sound confusing? It’s a bit technical, but taking a rescue course from a qualified instructor should help clear things up. What’s important to know is that three antennae beacons are much more accurate than two antennae beacons.
So, what does this mean for you? Three-antenna beacons are easier for other beacons to locate in the event of a slide, and are more accurate to search with—making them the best choice. While two antennae beacons haven’t entirely been phased out, the Canadian Avalanche Association still suggests buying a used three antenna beacon if you're tight on cash instead of a two antenna.
Send and Search Modes
An avalanche beacon has two main modes: send (transmit) and search (receive). Send mode means that the beacon is transmitting a signal outward, and it can be found. This means that in the event of a slide, the beacon of the buried party member is transmitting a signal, and any remaining party members and rescuers will then switch their beacons to search mode to locate their partner. Some beacons, like the Barryvox S2, have an automatic "revert to send" mode if you're in a search for too long. This is to help you stay safe in the event of a secondary avalanche while you're potentially digging out a partner.
In search (receive) mode, visual and audio messaging directs rescuers towards the buried victim(s). Most modern beacons have a legible screen that displays arrows and numbers—denoting distance and direction to the victim’s transmitting signal—and a speaker that sounds alerts (that increase in cadence and often pitch) so you know when you’re getting closer without constantly looking at your beacon. Some systems have more fail-safe features to keep you on track than others.
Search Range and Width
Most avalanche beacon manufacturers claim a search range between 50 and 80 meters. This is the advertised maximum distance from which the beacon will be able to pick up a transmitting signal under ideal conditions. Entry-level models like the BCA Backcountry Tracker S have a maximum range of 50 meters, whereas the top-of-the-line Mammut Barryvox S2 reaches up to 70 meters (or up to 90m in analog mode). Oftentimes, brands will distinguish between search width (side-to-side range) and maximum search range (out in front of you), although the two numbers are always within the same ballpark. It's important to note that these distances are based on both beacons being in ideal "coupling positions," meaning their antennas are oriented in an optimal orientation for searching and transmitting signals to one another.
Most avalanche instructors teach search patterns based on a 40-meter radius, meaning that any beacon here is appropriate for a Level 1 or 2 course. This is also the range in which beacons become the most reliable—you might start to get a signal from 50 or 60 meters away, but it is still likely to bounce around or disappear and come back depending on which direction you’re facing. In the end, it’s important to get to know your beacon and familiarize yourself with its range rather than relying solely on the number you read on a label or product page. Practicing with your beacon will help you determine the range at which you can reliably pick up a signal.
Digital vs. Analog Beacons
All current avalanche beacons operate digitally, although a few high-end models—including the Mammut Barryvox S2, Black Diamond Guide BT, and Arva Neo BT Pro—give you the option of swapping between analog and digital modes. Without going too deep into the details, the important thing to understand here is that analog beacons can pick up transmitting signals from farther away through the use of audio transmissions (most beacons with analog capability come with a headphone jack). Before a digital beacon might recognize these audio beeps as a signal, your ear can pick them up. But in the end, these are just minor details and likely won’t be impactful in a stressful real-life scenario. The good news is that digital beacons are much faster and easier to use than those of the analog variety.
Avalanche Beacon Functions
We could write a whole separate article about the numerous different functions for beacons. From the novel Ortovox Diract Voice talking its users through searches verbally, to Bluetooth connection, to the Pieps app that provides practice scenarios—there are a lot of options out there. Here are some of the most common.
Auto Revert-to-Transmit
Many modern beacons now have auto-revert functionality, which is a safety measure in the event of a secondary avalanche. Picture this: one of your ski partners is buried in a slide. While you’re searching (beacon in receive mode), another avalanche rips down from above and buries you. Now, you’re trapped underneath snow and your beacon isn’t transmitting a signal. With the auto-revert feature, your beacon automatically switches back to send mode after a certain number of minutes (generally 1 to 8) of inactivity, preventing a scenario in which searchers are buried and cannot be located.
Auto-revert functionality differs considerably among beacon models and could very well be a deciding factor in which model you choose. Some are simply time-based, meaning they revert back to send mode after a number of minutes (this could potentially happen in the middle of a search, but fortunately, most sound an alert before switching). Others have a motion sensor that detects your movement: if you’re not moving (i.e., potentially buried), they’ll switch back to sending after a short period of time (for Ortovox beacons, this period is 2 minutes). Many beacons, like Black Diamond/Pieps’ models and the Backcountry Access Tracker3, allow you to turn off the auto-revert function, select it upon start-up, or choose the amount of elapsed time. Given this feature’s importance in keeping us safe, we like to have the option to customize (BCA does a great job of detailing reasons for this here).
Multiple Burials and Signal Suppression
Most modern avalanche beacons have a multiple-burial indicator. This means that the beacon can detect more than one transmitting signal and will show this on the display screen (some will denote 2 or 2+ signals, but it's becoming more standard for models to have this feature). Models like the BCA Tracker3 and new Tracker4 even indicate with parentheses if the burials are in close proximity (within 6m of the searcher). This feature is not essential, but it is certainly nice to have, especially for those who regularly adventure with larger groups.
In addition to a multiple-burial indicator, another helpful tool to have is signal suppression, also referred to as “flagging” or “marking.” In the case of multiple burials and multiple searchers, the searchers can work together to locate victims and then divide resources while continuing the search for a second victim. Once the first victim is located, the searcher will mark their transmitting beacon (thus silencing—or suppressing—it) and continue to look for the next-closest signal. Avalanche beacon models can vary quite a bit in how this function works: some of the higher-end options will show a list of all signals, and the user can select which signal to follow, while models like the Tracker3 can only suppress one signal and only for a minute (in our opinion, this is one of the Tracker3’s biggest shortcomings).
Self-Test and Group Check
Most avalanche beacons perform a self-test when turned on, checking to see that the antennae are transmitting a signal and the battery has enough charge. If your beacon fails its test, it should display an error code and/or sound an alert. Beacons will also show their battery life during the self-test, and some models even let you know if they’re picking up electronic interference (such as from a cell phone).
Some beacons also have a built-in group-check mode, which basically drops the beacon's range to a handful of meters so that, in a busy space with a lot of people, it can verify signals with more certainty. This is a helpful tool when getting organized at the trailhead, but certainly not necessary. Unless you’re consistently a group leader, it likely won’t be a deal-breaker in selecting the right beacon for you.
Weight and Dimensions
Avalanche beacons are small enough to fit in your hand and tip the scales at around 5 to 8 ounces. In general, weight will not be a deciding factor for most, although there are a few ultralight models that will appeal to skimo racers, ski mountaineers, and other gram-counters. Often, the more important spec is a beacon’s dimensions, as many prefer streamlined models that can slip into their pants pocket. On the flip side, some beacons add rubberized molds for better handling and added durability, including the new Tracker4 and Black Diamond’s Recon and Guide BT. Further, some of the larger models feature big display screens and more glove-friendly toggles, which certainly makes them easier to use. Before making a purchase, be sure to weigh your priorities and preferences on weight and size versus overall usability.
Durability and Waterproofing
Given that beacons are designed for use in winter conditions and a lifeline when buried under feet of snow, you’d assume that they’re incredibly durable and highly waterproof. Unfortunately, however, that’s not entirely the case. Whereas some equipment, like headlamps and watches, are subjected to drop testing and given industry-standard waterproof ratings, beacons have no such requirements. Though this is an exception, we have heard from a ski guide that while on a rainy exam day in the wet Cascade mountains of Washington State, their beacon signal cut out entirely, due to water exposure. For this reason, we recommend limiting your beacon’s exposure to the elements by keeping it safely stowed close to your body and always underneath your outer layers. Some models are slightly more robust than others, like BCA’s rubber-encased Tracker4, but most forego added durability measures.
Avalanche beacons do not have firm lifespans. That said, most manufacturers will recommend replacing your beacon approximately every ten years or less due to damage to internal components, wear and tear, changes in technology, etc. Above a certain number of years, it is essential that your beacon be in good working condition—an older beacon in good condition is better than a relatively new one in disrepair. This is where servicing comes in. Mammut, for example, recommends that you have your beacon serviced every 3,000 hours or 3 years, and their technicians will do a far more comprehensive check than the beacon does in its self-test mode (if it has one). There are also periodic firmware/software updates for many beacons that will ensure they continue performing well. Finally, regardless of what manufacturers recommend, it’s always better to be safe than sorry. If your beacon is having issues or you notice anything “off,” don’t postpone getting a replacement or sending it in for repair.
Recalls
Over the years, there have been a handful of safety recalls on various beacons from different manufacturers. Due to the critical nature of beacons to backcountry recreationalist safety, it makes sense that any issue is recalled. These recalls range from voluntary to mandatory and sweeping—from accepted and minor, to major and more political. The Canadian Avalanche Association has a page with recalls that gets updated semi-regularly, but we recommend staying up to date on your particular device on the manufacturer's website. Oftentimes, brands recommend you register your device with them online after purchase, which signs you up for a mailing list for updates about your specific product.
Batteries and Battery Life
Avalanche beacons typically operate using AA or AAA alkaline batteries, although some can use alkaline or lithium. If you opt for one of those models, you’ll want to be sure that your beacon’s internal settings are set to your battery of choice. It's quite important to know which batteries your beacon takes and follow instructions, or else you can end up with a malfunction in battery life reading. Manufacturers will specify which batteries to use and approximately how long the batteries will last—in our specs above, we’ve noted the battery life in send (transmit) mode. Batteries last longer in send (transmit) mode than in search (receive), so if you’re practicing with your beacon frequently, you may notice the battery life drops more quickly.
Beacons indicate how much battery power remains either with a percentage (our preferred method) or bars. Some beacons will show the battery power only when powered on, while others will display it on the screen at all times. Deciding when to change out the batteries is a personal choice, though 60-70 percent is a conservative limit to ensure you’ll always have enough juice in the field. Batteries are cheap when you put the same price tag on your life, so we recommend always keeping a spare set of batteries in your repair kit, along with whatever tool you might need to open the battery case. Finally, don’t forget to remove the batteries at the end of the season and put in a fresh set at the start of the next. Otherwise, they can corrode during the off-season and damage the device.
Battery life can vary a great deal between models. For example, the Ortovox Diract is advertised to last for 200 hours, while the Black Diamond Guide BT doubles that at 400 hours (600 with lithium batteries). But while this might seem like a crucial spec to consider, it’s really not all that impactful. Think about it: if you’re averaging 5-hour tours and aren’t practicing all the time, you can get 30+ days on one set of batteries—and that’s at the low end (of course, you'll want to change them out before the battery life is too low). In fact, we’ve gone for an entire season with the Tracker3 (battery life: 250 hours) and only changed the batteries once. In other words, even the lowest battery life is still decent, and you shouldn’t be churning through batteries unless you’re getting out there every day or instructing multiple courses in a season.
Bluetooth Connectivity
In 2025, more and more avalanche beacons offer Bluetooth connectivity to help you easily manage settings and update software. The Mammut Barryvox S2 added this functionality this past year. We consider this a nice addition—Bluetooth capability does make it easier to dig into advanced settings and play around with the functionality of your beacon—but it's not quite on our must-have list. In the end, most people won't have too much trouble accomplishing basic tasks on their beacon's display screen.
Beacon Harness And Tether
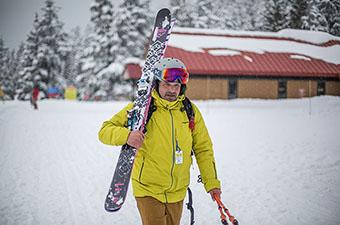
There are two primary ways to carry an avalanche beacon: in an integrated, dedicated zippered pant pocket with a tether, or in a manufacturer-provided harness with a tether. Let’s start with harnesses. Most beacons are sold with an included harness, although Arva is one exception and sells them separately. Many harnesses center the carrying case on the front center of the torso, with straps going around the waist and one shoulder. Importantly, your beacon should always be worn inside your clothing, underneath any jackets or outer layers. Ideally, you should have a layer over your beacon at all times to limit the risk of damage or loss in the event of an avalanche.
If you choose to store your beacon in a pocket, know that there are important nuances to this choice. What is now considered best practice is that the beacon must be in a dedicated pocket, meaning that the manufacturer has designed this pocket specifically for an avalanche beacon. It will have a reinforced clip-in point for the elastic tether, and it’s also important that you don’t put anything else in this pocket, and keep the zipper closed all day. Secondly, the pocket must be integrated into the pants. What do we mean by that? You’ll see a lot of pants with cargo pockets on the thighs that are sewn to the outside—basically, the pocket (and its contents) sit outside of the pants. In recent years, professionals have noted cases of external pockets like this being torn from victims in avalanche accidents. So, no external cargo pockets, dedicated, integrated pockets only if you’re not going to use the beacon tether.
Firmware & Software Updates
Many of today’s avalanche beacons come with upgradable software and firmware. Some require that you take your beacon into a local shop or send it to the manufacturer for an update, while most can be upgraded via micro USB or—in the case of Black Diamond/Pieps and some Mammut models—Bluetooth connectivity. Beacon manufacturers are always improving their technology, and it’s a big bonus that you can get better tech without purchasing a new device (for example, our now-discontinued Ortovox 3+ was overly sensitive to cell signals in the self-test, but this was later improved in an update). Just like a smartphone or computer, keeping your beacon up-to-date will help maximize its performance.
Avalanche Education
Buying a beacon, shovel, and probe is a great first step toward realizing your backcountry goals, but it's only one of many critical factors. In addition to the gear you bring, proper avalanche safety includes learning about the intricacies of the snowpack and weather, as well as the ability to identify and safely navigate avalanche-prone terrain. This, along with many other considerations in a complex and dynamic environment (like recognizing and mitigating human factors), is a lifelong process. Skiing or riding in the backcountry can be one of the most rewarding experiences out there, but it can be overwhelming when you’re first getting into things—where to start?
If you’re just getting started and want to get a better sense of what you’re getting into, signing up for a basic Avalanche Awareness class in your area is a great start. These classes are often a handful of hours in the evening, presented in a classroom, and are a great place to get acquainted with why to buy a beacon in the first place. While not available nationally, avalanche centers like the Northwest Avalanche Center and the Utah Avalanche Center offer free awareness events throughout the season, taught by experienced instructors.
If you take an awareness class and find yourself invested in the next steps, a Level 1 avalanche course from an American Avalanche Association-accredited provider is your next stop. There are a handful of providers in the U.S., depending on your region. For example, the American Institute for Avalanche Research and Education (AIARE) is popular in California, Colorado, and Washington State, while the American Avalanche Institute (AAI) is popular throughout much of the Intermountain West. A full list of recreational providers is at this Avalanche.org course page, by region. In addition, solid mentorship by an experienced, trustworthy backcountry traveler is one of the best ways to grow your skills. However you seek your education, keep in mind that not only is avalanche education a great investment for yourself, but it's critical for your touring partners’ safety as well.
Completing Your Backcountry Kit
A beacon is just one piece of the avalanche safety puzzle and should always be accompanied by both a probe and shovel, as well as the knowledge of how to use them. Some skiers and riders, especially those who frequently head into avy-prone terrain, might also carry an avalanche airbag pack for extra assurance in the event of a slide. In terms of other clothing and equipment, our backcountry skiing checklist is a good place to start and details everything you need for a day on the slopes, from jackets and pants to accessories like ski socks and gloves. Some skiers and riders, especially those who frequently head into avy-prone terrain, might also carry an avalanche airbag pack for extra assurance in the event of a slide, though it's not a replacement for rescue gear and training. We've assembled in-depth round-ups of the year’s best offerings, including splitboards, backcountry skis and boots, ski helmets and goggles, climbing skins, and much more. Adventuring in the backcountry can be incredibly beautiful and rewarding, but there are a lot of inherent risks, and having the right gear is crucial to staying comfortable and safe.
Back to Our Top Avalanche Beacon Picks Back to Our Beacon Comparison Table